Showing posts with label cheese. Show all posts

Monday, September 9, 2019

Goat Cheese and Mushroom Pasta


It's pasta time (again)! Recently I came across a Facebook video of a goat cheese pasta sauce recipe, which basically involved mixing warm pasta water with cheese, and that gave me an idea for a very quick and affordable dish. However, I did not want just plain pasta and sauce, maybe some extra seasoning, so I threw some more ingredients in there which I had around and also felt they would make sense. The result surprised me and made me ask myself why I did not think of that earlier, especially since I am a huge goat cheese lover. ( I have it in my fridge almost 90% of the time). Anyhow, now I can add on my list a new tasty recipe that only takes 15 minutes, so better late than never, right?

Ingredients (for one portion):
  • aprox. 65 g dried pasta
  • one hand of sliced mushrooms ( I used a mix)
  • 2 slices of ham
  • 60 g creamy goat cheese
  • pasta water
  • one garlic clove
  • parsley
  • salt and pepper 
  • Parmesan (optional)  
I started with pasta the water. I usually boil it in a water cooker and then put it on the stove, because then it takes less than 5 minutes to reach the optimal boiling point, so everything moves way faster. Don't forget to properly salt your water.

In the meantime I sliced the mushrooms, the ham and chopped the garlic and I roasted them in one teaspoon of olive oil. When my water was boiling I added the pasta and I cooked it until al dente, according to the packaging instructions. 

After the pasta was cooked I added it over my roasted ingredients, turned off the heat, and then added the goat cheese and a little bit of pasta water, while giving it a proper stir. I kept stirring (and gradually adding water if it was necessary) until de cheese melted and a beautiful soft and creamy sauce formed. I ended by adding fresh parsley, seasoning with salt and pepper, and sprinkling some Parmesan.


                                                  Enjoy! 

Thursday, February 1, 2018

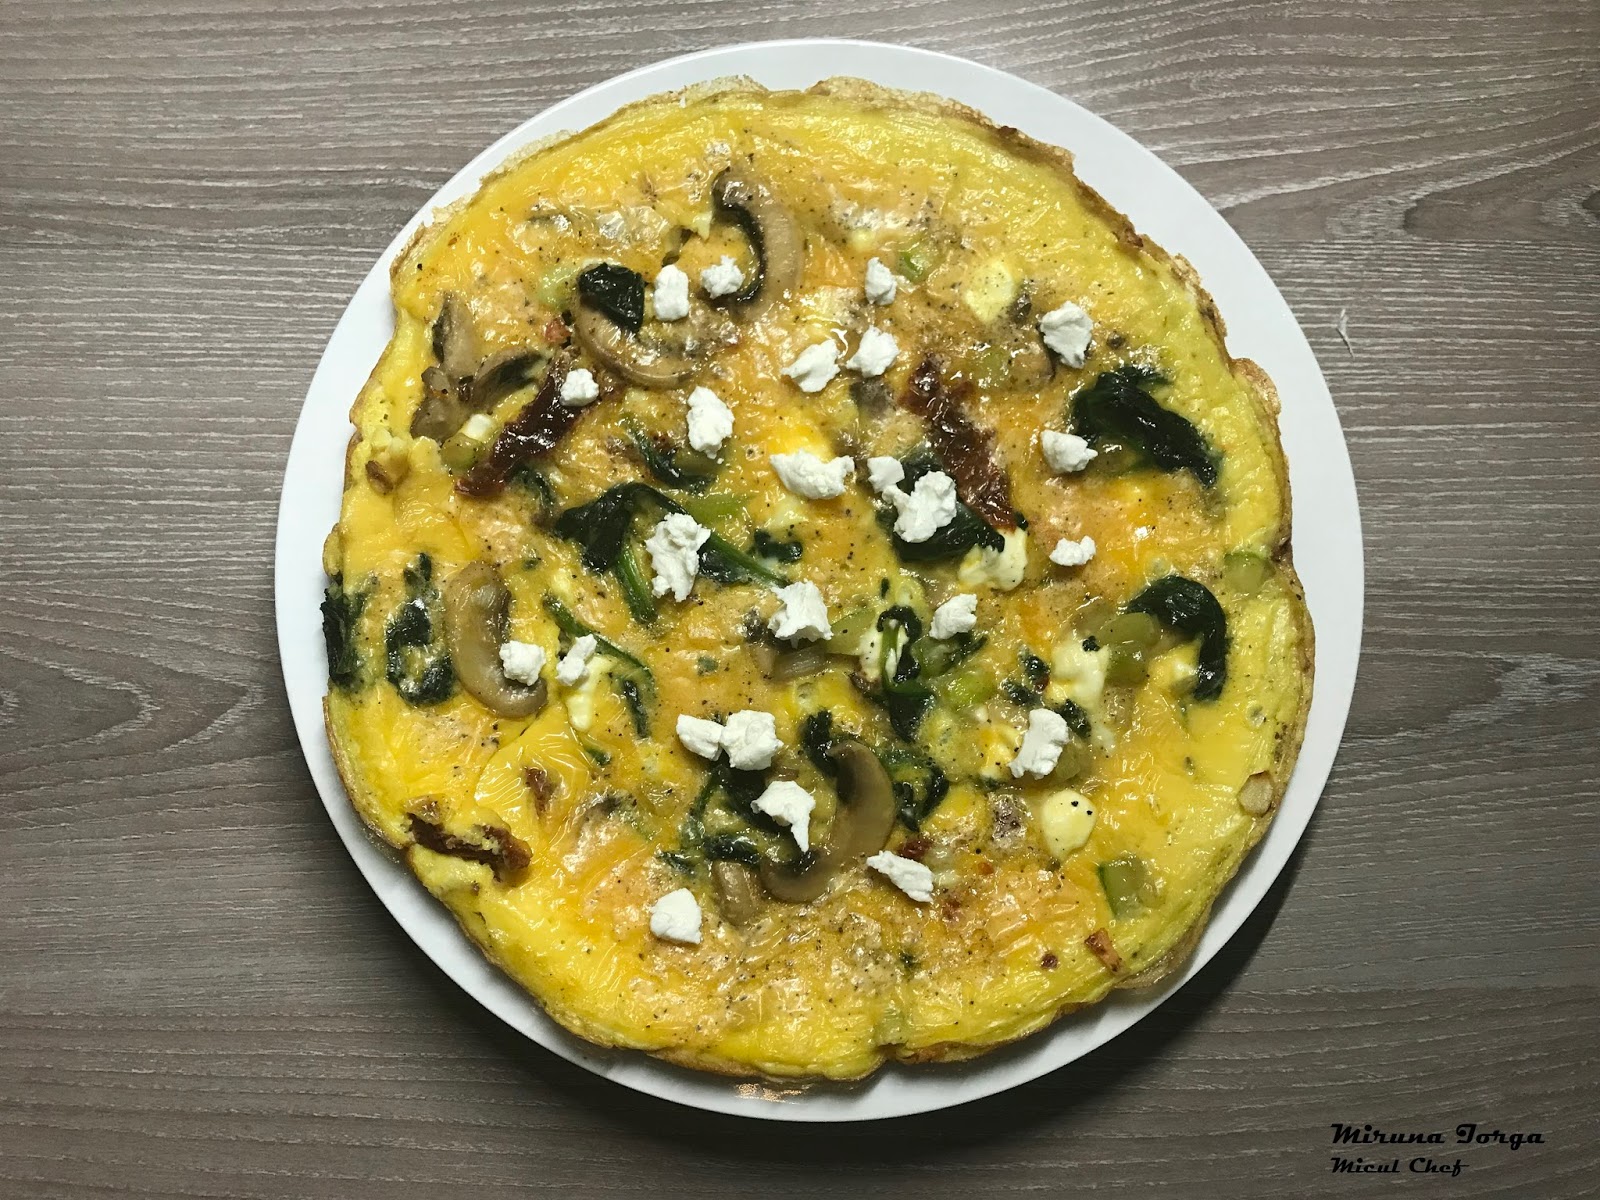
Veggie Frittata

Romana:

    Mic dejun, brunch sau pranz? Exista un preparat potrivit pentru toate aceste mese, gustos, satios si usor de gatit. In esenta, Frittata este un preparat italian ce se aseamana cu o omleta, insa este mult mai complex prin varietatea ingredientelor folosite, de la legume, la carne si paste si prin modul de preparare, fie pe aragaz, fie la cuptor. Astazi prezint reteta mea proprie in care mi-am explorat creativitatea cu legumele pe care le aveam in frigider. De asemenea, am preferat sa gatesc preparatul doar pe aragaz, si desi ouale si pot amesteca cu lapte sau cu smantana lichida, am preferat sa raman in limitele unei retete light si clasice.

Ingrediente:
  • 5 oua
  • 2 Lg ulei de masline extra virgin
  • 100 g spanac proaspat
  • 1 ceapa mica
  • 1/3 dintr-un dovlecel mediu
  • 150 g ciuperci mix 
  • 3-4 bucati rosii deshidratate
  • branza de capra 
  • fulgi de chili
  • sare
  • piper
    Intr-o tigaie am pus pus uleiul de masline la incins, apoi am calit la foc mediu ciupercile si dovlecelul taiate in bucati medii si am adaugat apoi spanacul si ceapa tocata marunt. Nu am uitat sa asezonez cu sare si piper dupa gust. Intr-un bol am batut cele 5 oua, am adaugat sare, piper si fulgii de chili. Cand legumele din tigaie au fost gata, am adaugat rosiile deshidratate tocate marunt si am presarat branza de capra, apoi am turnat imediat ouale batute si am dat focul la mic. Este important sa lasam legumele sa se gateasca bine inainte de a adauga ouale pentru ca sucul lor sa se evapore, astfel Frittata se va gati uniform. Dupa ce ouale au fost pe jumatate coagulate, am pus capacul tagaii si am lasat in continuare la foc mic pana cand ouale au fost complet coagulate si preparatul era auriu. La final, pentru extra gust, am presarat inca putina branza de capra.

Pofta buna!

English:   

    Breakfast, brunch or lunch? There is a dish that suits all of these meals, tasty, nourishing and easy to cook. Essentially, Frittata is an italian dish that resembles omlette, but is more complex due to the variaty of ingredients used, from vegetables to meat and pasta, and due to its cooking procedure, either on the stove or in the oven. Today, I'm presenting my own recipe in which I explored my creativity with the vegetable I had in the fridge. Also, I preferred to cook the dish just on the stove, and although the eggs can be mixed with milk or cream, I prefered to stay in the range of a light and classic recipe.

Ingredients:
  • 5 eggs
  • 2 spoons extra virgin olive oil
  • 100 g fresh spinach
  • 1 small onion
  • 1/3 medium zucchini
  • 150 g mushroom mix
  • 3-4 sundried tomatoes
  • goat cheese
  • chili flakes
  • salt
  • pepper
     In a pan I heated the olive oil on a medium heat and then I cooked the mushrooms and the zucchini medium chopped, then I added the spinach and the finely chopped onion. I didn't forget to add slat and pepper. In a bowl I whisked the eggs and I added salt, pepper, and chili flakes. When the vegetables in the pan were ready, I added chopped sundried tomatoes and goat cheese and I quickly poured the eggs and let them cook on low heat. It is essential to cook the vegetables well before adding the eggs, thus their juice will evaporate and the Frittata will cook properly. After the eggs were half coagulated I covered the pan and let them fully cook until golden brown. In the end, for an extra taste, I sprinkled more goat cheese.

Enjoy!

Friday, May 20, 2016

Cheesecake cu capsuni si jeleu de fructe de padure


    Este pacat ca tocmai in sezonul capsunilor sa nu le valorifici la maxim. Si ce merge mai bine cu niste capsuni proaspete decat un cheesccake usor si racoritor perfect pentru luna mai. Ceea ce iubesc la un cheesecake fara coacere este ca toate ingredientele isi pastreaza prospetimea, iar rezultatul final consta in unul dintre cele mai fresh deserturi. De asemenea, in sezonul cald nu imi place sa aduag prea mult zahar preparatelor petru a nu le incarca prea mult.

Ingrediente:
  • 300 g capsuni proaspete
Pentru blat:
  • 400 g biscuiti digestivi
  • 150 g unt 
Pentru crema:
  • 400 ml smantana lichida
  • 500 g branza de vaci
  • 250 g mascarpone
  • 80 g zahar pudra
  • 2 pliculete zahar vanilat
  • un  baton de vanilie
  • 30 g gelatina
Pentru jeleu:
  • 300 g fructe de padure (zmeura, afine si mure)
  • 3 Lg zahar
  • 100 ml apa
  • 10 g gelatina
! Pentru acest desert am folosit o forma cu inel detasabil cu diametrul de 26 cm

Blatul
    Incepem intai cu primul strat al prajiturii, si anume blatul. Am topit untul, apoi intr-un robot de bucatarie am macinat biscutii si am adaugat treptat tot untul, apoi am asezat amestecul in forma si cu ajutorul palmelor l-am presat pana ce a devenit compact. Am tinut apoi blatul la frigider pentru 30 de minute.

    Am spalat capsunile, le-am taiat cotorul si le-am taiat in jumatati, asezandu-le vertical pe marginea formei, cu varful indreptat in sus, ca in imaginea alaturata.


Cum asezam capsunile
    Pentru crema am amestecat branza de vaci cu mascarpone, am adugat vanilia, zaharul pudra si zaharul vanilat si am continuat sa amestestec pana la omogenizare, apoi am turnat treptat smantana lichida. Am preparat gelatina conform instructiunilor de pe ambalaj, si am incorporat-o in crema pe care ulterior am turnat-o peste blat si capsuni, tinand apoi preparatul la frigider minim 5 ore.

   Dupa ce crema mea s-a intarit m-am apucat de prepararea jeleului. Intr-o craticioara am adaugat fructele, zaharul si apa si am lasat sa dea in clocot aproximativ 5 minute. Dupa ce s-au racit usor, am pasat fructele cu un blender pana am obtinut un sos cremos. Am preparat gelatina conform instructiunilor de pe ambalaj, am incorporat-o in sosul de fructe pe care l-am turnat in forma de prajitura peste crema. Am lasat prajitura la frigider pentru alte inca 5 ore.
    Dupa ce si jeleul s-a intarit, prajitura este gata de servire.


                                        Pofta buna iti doresc!


Sunday, November 15, 2015

Classic cheesecake


For those of you who do not know me, I have to admit I adore cheesecakes. Baked or just chilled in the fridge, with fruits or chocolate, I could never refuse such a portion of joy. Today I decided to take advantage of this cold Sunday, treating myself with something sweet and sharing with you some of my little tricks.

Ingredients ( I used a round  baking tray with the diameter of 22 cm).

For the base:
  • 40 g unsalted butter, and a little extra for greasing the tray
  • 150 g digestive biscuits
For the cheese mixture:
  • 250 g cream cheese (I used Philadelphia) 
  • 250 ricotta
  • 250 g mascarpone
  • 3 large eggs
  • 100 g granulated sugar
  • 1 Tbsp. semolina
  • 2 tbsp. vanilla essence
  • juice and zest from one lemon
  • 2 Tbsp. cognac

First I greased the baking tray with butter and I covered its base with baking paper. Then I preheated the oven at 150 degrees Celsius/ level 2 on gas and in the meantime I started preparing the biscuit base.

In a kitchen robot I crushed the biscuits until they had the texture of breadcrumbs. You can also do this step by hand. Just put the biscuits in a bag, cover it with a kitchen towel and find something heavy, like a meat hammer or even an empty wine bottle to crush it until the biscuits inside have the right texture. After my biscuits were ready I mixed them with the melted butter. If you are using a kitchen robot it will be easier for you to mix them, but by hand is also fine. I added the mixture in my baking tray, spreading it evenly, and then I used the bottom of a glass (you can also use your hands) to press it into the tray and make sure it is well compressed and even. It should look similar to my picture. I baked the biscuit base at 150 Celsius for 10 minutes, then I let it completely cool down.

Next, in a bowl I mixed the cheese with the sugar and semolina. Then I added the eggs, one by one, until fully incorporated, and lastly I added the vanilla, lemon and cognac. I poured the mixture over my biscuit base and I baked it at the same temperature for 80-90 minutes, until it became golden and the sides were golden brown (check the picture). Try to pay attention to your cake after 70 minutes have passed.

! Even though the cake is baked, the mixture will still be soft and creamy, therefore you need to leave the cake to completely cool down, so the cheese mixture can fully thicken. I left my cake to cool down in the oven, with the door open, which I also recommend you to do.

After this step is complete, your cheesecake is ready. Feel free to decorate it as you wish, add fruits, chocolate, or keep it simple and eat it like this. Either way, I can guarantee you it is delicious.


Enjoy! :D

Sunday, October 18, 2015

Cannelloni cu ricotta si spanac

In mica mea calatorie prin Italia am incercat diferite preparate specifice, insa acesta mi-a starnit interesul intr-o zi oarecare, undeva prin Centrul Vechi. Si desi l-as fi gatit mai repede, un singur lucru mi-a stat in cale: insuportabila caldura a verii. Caci la peste 30 de grade, nimanui nu-i mai arde sa porneasca si cuptorul.  Astazi, insa, m-am pus pe treaba.


Ingrediente:                                           
  • 225 g cannelloni
  • 500 g spanac 
  • 500 g riccotta
  • 75 g parmezan 
  • nucsoara 
  • mozzarella
Pentru sosul rosu:
  • 650 ml suc de rosii
  • 5 catei usturoi
  • busuioc
Pentru sosul alb:
  • 250 ml smatana pentru gatit
  • 75 g parmezan 


Pentru sosul rosu se curata cateii de usturoi, se taie si se calesc in putin ulei de masline. Se adauga sucul de rosii si busuiocul si se lasa pe foc pana da in clocot. Pentru ca am avut la indemana am folosit busuioc proaspat, datorita aromei intense a acestuia. Adaugati sare si piper dupa gust. Pentru sosul alb se rade parmezanul si se amesteca cu smantana.

Spalati apoi spanacul si opariti-l 2 minute intr-o oala cu apa
clocotita. Scurgeti-l, lasati-l sa se raceasca si tocati-l marunt. Amestecati spanacul cu ricotta si parmezanul si razuiti 1/4 dintr-o nucsoara. Adaugati sare si piper dupa gust.

Umplerea pastelor se face cu un sprit ( sau cu o punga taiata la un colt). Puteti cere o mana de ajutor pentru acest proces daca simtiti nevoia, insa daca sunteti singur, pentru a va usura treaba, pozitionati pastele tubulare vertical, asa va puteti folosi ambele maini pentru manevrarea spritului.

  Preincalziti cuptorul la 180 de
grade. Turnati uniform sosul rosu intr-o tava de 25x35 cm. Asezati apoi pastele si turnati sosul alb peste ele. Puneti apoi felii de mozzarella. Asezati tava in centrul cuptorului si lasati-o cca 30-35 de minute.


                 Pofta buna!

Sunday, October 11, 2015

Cheese Mousse and Lemon Curd Tart


English: (Romanian below)

For me the tart is the ideal dessert because it offers you the possibility to be creative. You can make a delicious combination with everything you find around your house: a variety of fruits, cream, etc. I chose this recipe because it represents the right balance between sweet and sour, thus being very refreshing. Moreover, it can be done anytime of the year due to its key ingredient, lemon, which can be found anytime in any store.

It takes 3 hours the complete this dish, not because it is very difficult, but because each element needs to cool down very well before it can be added.

For the crust we need:
  • 250 g flour
  • 125 g cold butter 
  • 100 g powder sugar
  • 2 egg yolks
  • one vanilla bean (can be replaced with 2 tsp bourbon sugar)
  • 2 Tbsp cold milk
I started by combining the sugar, flour and vanilla, the I added the yolks and the butter sliced in small cubes and I mixed them all together (by hand or with the help of a kitchen mixer) until the dough started to look like bread crumbs. In the end I added the milk and I mixed a little bit more with my hands until the dough was done.
! Try to mix as less as possible, otherwise the dough will become elastic which is not what we want. Also, keep the dough in the fridge for at least one hour before baking. 
After that, on the kitchen counter where I sprinkled some flour, I stretched the dough with a rolling pin until it had aprox. 5 mm. I greased a 26 cm diameter round baking tray with some butter, I put the dough in the tray, I baked the tart in the preheated oven at 180 Celsius for aprox. 20 minutes until golden and then I let it completely cool down.
TIP: To prevent your tart from rising while baking in the oven, cover the middle of it with some baking paper and pour some kidney beans on top of it. Their weight will prevent the tart from rising. 
For the cheese mousse we need:
  • 200 g cream cheese 
  • 100 g white chocolate
  • 200 ml whipping cream
  • 1 tsp vanilla essence
I melted the white chocolate at Bain-Marie* in a heat resistant bowl and then I let it completely cool down, while in a separate bowl I whipped the cream. Finally, I combined the cream cheese with the chocolate and vanilla and I gradually added the whipped cream with the help of a spatula, using circular moves, in order to keep it fluffy and to keep the mousse texture of the mixture. I added the mousse on the tart crust and put it in the fridge for 2 hours.
For the lemon curd we need:
  • 5 egg yolks
  • 100 ml lemon juice
  • 210 g granulated sugar
  • zest from 2 lemons
  • 100 g butter with high fat
I mixed all the ingredients above and I kept them at Bain-Marie* for aprox. 20 minutes, continuously stirring, until the mixture became thick and shiny. It is important to stir slowly, in one direction, to prevent the mixture from separating. After it was done I let it cool down and I poured it over the tart, which I left over night (or at least 6 hours) in the fridge, until the curd became a jelly.

*Bain-Marie= heating our mixture over a pot of hot, almost simmering, NOT BOILING water, where our bowl does not touch the water in the pot. This technique is used because the steam created is a more gentle source of heat than the direct heat of the stove which could ruin our dish.

Enjoy! 

Romana:

Pentru mine, tarta este desertul ideal deoarece iti da posibilitatea sa fii creativ. Poti realiza o tarta gustoasa cu orice gaseti prin casa: o  multime de fructe, crema etc. Am ales aceasta tarta deoarece reprezinta combinatia ideala intre dulce si acru, fiind foarte racoritoare. De asemenea, poate fi facuta in orice anotimp deoarece ingredientul cheie este lamaia, gasita oricand la magazine.
Prepararea dureaza cca 3 ore, nu pentru ca ar fi greu de gatit, ci pentru ca toate cele 3 elemente trebuie lasate la racit inainte de a fi "asamblate".
                                                                
                
Pentru blatul de tarta avem nevoie de:
  • 250 g faina
  • 125 g unt rece
  • 100 g zahar pudra
  • 2 galbenusuri
  • o pastaie de vanilie ( daca nu aveti se poate inlocui cu un pliculet e zahar vanilat bourbon) 
  • 2 linguri lapte rece
Am amestecat zaharul cu faina si cu vanilia, apoi am adaugat untul taiat cubulete impreuna cu galbenusurile si am amestecat (cu mana sau cu ajutorul unui robot de bucatarie) pana cand compozitia a capatat aspectul unor firimituri. La final am adaugat cele 2 linguri de lapte si am cotinuat sa amestec cu mana pana cand aluatul a devenit omogen.

! Incercati sa framantati cat mai putin posibil, altfel aluatul va deveni elastic, ceea ce  nu e de dorit. De asemenea, aluatul trebuie sa stea la frigider cel putin o ora inainte de coacere.

Pe blatul de bucatarie am presarat faina si cu ajutorul unui facalet am intins aluatul de tarta la grosimea de cca. 5 mm.  Am uns o forma de tarta rotunda cu diametru de 26 cm cu unt apoi  am asezat aluatul in forma si am copt apoi tarta in cuptorul preincalzit la 180 de grade cca 20 de minute si am lasat-o sa se raceasca complet.
PONT: Pentru ca tarta sa nu se umfle in cuptor, acoperiti-o cu foaie de copt si puneti deasupra o mana de boabe de fasole. Greutatea acestora va impiedica tarta sa creasca.


Pentru mousse-ul de branza avem nevoie de:
  • 200g crema de branza
  • 100 g ciocolata alba
  • 200 ml smantana pentru frisca
  • 1 lg esenta de vanilie

Am topit ciocolata alba la Bain-Marie* intr-un vas termorezistent si am lasat-o sa se raceasca, iar int-un vas separat am butut apoi frisca. In cele din urma am amestecat crema de branza cu vanilia si ciocolata topita si cu ajutorul unei spatule am incorporat frisca, in mai mule transe, cu miscari circulare, pentru a ramane aerata si pufoasa si pentru a putea conferi in continuare textura de mousse dorita. Am turnat compozitia in forma de tarta si am dat-o la rece pentru 2 h.
 

Pentru curd-ul de lamaie avem nevoie de:
  • 5 galbenusuri
  • 100 ml zeama de lamaie
  • 210 g zahar tos
  • coaja de la 2 lamai
  • 100 g unt gras
Am amestecat toate ingredientele de mai sus la Bain-Marie* pentru cca 20 de minute, pana cand compozitia s-a ingroasat si a capatat o textura lucioasa. Important este sa amestecati incontinuu, lent, in sensul acelor de ceas, pentru a evita taierea compozitiei. Dupa ce aceasta s-a racit, am turnat curd-ul peste tarta si am tinet la frigider cel putin 6 ore (ideal peste noapte), pana cand curd-ul de lamaie a  capatat aspectul unui jeleu.

*Bain-Marie= incalzirea amestecului la baie de aburi, deasupra unei oale cu apa fierbite, nu data in clocot. Aceasta tehnica este folosita deoarece aburul este o sursa de caldura mai blanda decat flacara directa a aragazului, care poate distruge preparatul.


                                                                       Enjoy! :)