Monday, March 29, 2021

Coconut shrimp tortellini


A while ago I started to cook very often with coconut milk as an alternative to cooking cream. I've been using it for soups, curries, and even desserts, until I decided it might be a fun idea to try it for pasta as well, although it seemed a little out of place. But by adding ingredients that usually go well with it, such as shrimps, I realized there is nothing that can go wrong. So I just threw in the pan some shrimps, spinach and coconut milk and the end result was amazing. Instead of regular pasta I used tortellini filled with cheese because this is what I had around the house. But this recipe is so flavorful that it will also turn out great with plain pasta. So with this post I hope to inspire all of you to use coconut milk more often in your recipes.

Ingredients (for 2 portions):
  • 200 ml coconut milk
  • 200 g spinach
  • 200 g shrimps
  • half a big onion
  • 1 garlic clove
  • 200 g dry tortellini 
  • salt 
  • pepper
  • garlic powder
  • chili flakes
  • nutmeg
  • 100 ml white wine
  • juice from 1/4 lemon
  • olive oil

First I started with marinating the shrimps a couple of hours before cooking. To do this I added 2 Tbsp. of olive oil, lemon juice, chilly flakes, 1 tsp. garlic powder, salt and pepper over the shrimps and made sure they are evenly coated. Important thing to keep in mind is to take the shrimps out of the fridge on time, so they can reach room temperature by the time you are cooking them.

Then I boiled some water and cooked the tortellini according to the packaging instructions. In the meantime I chopped the onion and garlic clove and roasted them on medium heat in 1 Tbsp. of olive oil until golden, and afterwards I added the wine and reduced. I continued by adding the coconut milk (if you find the coconut milk too heavy or too intense in flavor, you can replace some of it with pasta water, as it will make the sauce lighter, but with the same creamy consistency), followed by the shrimps and spinach. I cooked for another 2-3 minutes until the sauce reduced and the shrimps got nice and pink (shrimps need very little time to cook). I turned off the heat, added the tortellini and as final touch I seasoned with some salt, pepper, and nutmeg. 


Enjoy! :)

Sunday, June 28, 2020

Lemon Cheesecake


Who doesn't love a smooth, sweet-sour citrus flavor? Recently, cakes with lime or lemon flavor have become extremely popular, like the well-known loaf cake, which I also find extremely delicious. Although I didn't bake a loaf cake, my cheesecake manages to captures perfectly the intense lemon flavor that I was aiming for, without adding any sort of lemon essence. I decided to combine 2 of my favorite recipes, taking my classic cheesecake recipe (found also here) and the lemon curd recipe that I used for my tart (found also here). While most of previous ingredients and instructions do not change, I made some slight adjustments for the cheesecake, making less cheese mixture. That is because I decided to make the lemon curd the star of the cake and tip the scale in its favor, so too much cheese would have slightly prevented that. In this case, less is actually better. This being said, let's get to work!

*For this recipe I used a round baking tray with the diameter of 26 cm

For the base:
  • 60 g unsalted butter, and a little extra for greasing the tray
  • 200 g digestive biscuits

First, I greased the baking tray with butter and I covered its base with baking paper. Then I preheated the oven at 150 degrees Celsius/ level 2 on gas and in the meantime I started preparing the biscuit base.

In a kitchen robot I crushed the biscuits until they had the texture of breadcrumbs. You can also do this step by hand. Just put the biscuits in a bag, cover it with a kitchen towel and find something heavy, like a meat hammer or even an empty wine bottle to crush it until the biscuits inside have the right texture. After my biscuits were ready, I mixed them with the melted butter. If you are using a kitchen robot it will be easier for you to mix them, but by hand is also fine. I added the mixture in my baking tray, spreading it evenly, and then I used the bottom of a glass (you can also use your hands) to press it into the tray and make sure it is well compressed and even. I baked the biscuit base at 150 Celsius for 10 minutes, then I let it completely cool down.

For the cheese mixture:
  • 250 g cream cheese (I used Philadelphia) 
  • 250 ricotta
  • 250 g mascarpone
  • 3 large eggs
  • 100 g granulated sugar
  • 1 Tbsp. semolina
  • 2 Tbsp. vanilla essence
  • juice and zest from one lemon
  • 2 Tbsp. cognac
Next, in a bowl I mixed the cheese with the sugar and semolina. Then I added the eggs, one by one, until fully incorporated, and lastly I added the vanilla, lemon and cognac. I poured the mixture over my biscuit base and I baked it at the same temperature for 80-90 minutes, until it became golden and the sides were golden brown. Try to pay attention to your cake after 70 minutes have passed.

! Even though the cake is baked, the mixture will still be soft and creamy, therefore you need to leave the cake completely cool down, so the cheese mixture can fully thicken. I left my cake to cool down in the oven, with the door open, which I also recommend you to do.

For the lemon curd: 
  • 5 egg yolks
  • 100 ml lemon juice
  • zest from 2 big lemons
  • 210 g granulated sugar
  • 100 g butter high in fat
    First I poured my freshly squeezed lemon juice through a strainer, to keep the pulp out. I put then all the ingredients above in a heat-resistant bowl which I put at Bain-Marie* for aprox. 20 minutes, continuously stirring, until the mixture became thick and shiny. It is important to stir slowly, in one direction, to prevent the mixture from separating. After the curd was ready I let it cool down and I poured it over the cheesecake, which I left over night (or at least 6 hours) in the fridge, until the curd thickened and had a jelly-like texture.

    Feel free to decorate your cheesecake as you wish, I went for some fresh lemon slices and mint leaves for some extra color.

    *Bain-Marie= heating our mixture over a pot of hot, almost simmering, NOT BOILING water, where our bowl does not touch the water in the pot. This technique is used because the steam created is a more gentle source of heat than the direct heat of the stove which could ruin our dish.


     Enjoy! :)

    Tuesday, June 23, 2020

    Tiramisu Cake


    Summer has finally come and is therefore time for some fresh desserts. Especially during this weird times, now that I am finally done with my final exams, I get to spend more time inside so I'm trying to cook something at least every few days. As much as I like to bake, when is extremely hot outside I do not feel like adding some extra degrees by turning on my oven, so any "no-bake" dessert is my favorite. This time I decided to go with a classic, but with a twist. Instead of using the usual rectangular tray, I chose to use a 26 cm diameter round tray to make the Tiramisu resemble a classic cake a little bit more. The texture of the cake and the consistency of the cream, after left overnight in the fridge, allows for the tiramisu to keep its shape even when the wall of the tray is removed. The quantity of ingredients described above allowed me to "build" 3 layers of ladyfingers and cream, matching exactly the height of the tray.

    Ingredients:
    • 400 g ladyfingers
    • 4 eggs
    • 4 Tbsp. granulated sugar;
    • 500 g Mascarpone
    • 350 ml coffee
    • Cocoa/ dark chocolate for decorating the top
    First step was to prepare my coffee and let it completely cool down. If you are in a hurry and wanna speed up this process, you can put the coffee mug in a bowl with cold water and ice and the coffee will almost cool down by the time you are ready with the cream and the ladyfinger assembly.

    Next step was to assemble my first layer of ladyfingers. Because I used a round tray, this step was a little tricky, as the ladyfingers were not filling the space perfectly, so I had to cut some of them and try to arrange the pieces like in Tetris, so they can fill the whole space. Don't worry about it too much, I can assure you the cake will still keep its integrity and look good.

    Then, I managed to proceed with the cream. One important aspect of this stage is that once you are done with it, you do not stop until your cake is in the fridge. This is because you are working with whipped egg whites, so if you take too much time to assemble all the layers, the cream will lose its mousse-like texture. To prepare the cream I started by separating the eggs. Using a mixer (you can also do it by hand), I whisked the egg yolks together with the sugar until it was all dissolved and the mixture got soft and tripled in volume. You should get a very creamy, light yellow mixture. I added the Mascarpone to the egg yolks, this time whisking by hand, not with a mixer, until it was fully incorporated and there were no lumps.

    In another bowl, with the help of a mixer, I whipped the egg whites until they got all fluffy and firm and passed the classic test, that is, if you turn the bowl upside down, they will not fall. With the help of a spatula I incorporated the egg whites into the Mascarpone mixture making only gentle, folding movements, so I can preserve the texture of the cream.

    After the cream was ready, I quickly added the coffee over the ladyfingers. I like to pour coffee over them, when they are already arranged in the tray, and not the other way around, first dipping them in coffee. I usually pour around 2-3 tsp. coffee over each ladyfinger. Then I poured 1/3 of the cream on them and evened it with the help of the spatula, repeating all these steps until I completed all 3 layers.

    Lastly, I powdered the top with cocoa, but if you like, you can also grate some dark chocolate. I left the cake overnight in the fridge and then served it in triangular cake-like pieces.


    Enjoy!

    Saturday, September 28, 2019

    Poke bowl


    When I moved to the Netherlands 2 years ago I was pleasantly surprised to see that Dutch people eat A LOT of raw fish. All around you could find various sushi restaurants, dozens of options of eating out or ordering, and what I think surprised me the most was the fact that you could buy relatively cheap and good quality sushi from the supermarket.

    After a while the trend emerged to the so called "Poke Bowl" which I have first heard of when I saw a restaurant delivering it. What is a Poke Bowl? Basically, "Poke" represents a traditional Hawaiian dish which consists of raw fish cubes mixed with oils and spices and served as an appetizer or main course. This dish later evolved into modern version, known as "Poke Bowl", which is a mix of raw fish, rice and vegetables. It makes you think of it as a deconstructed sushi roll. Take the fish, rice, seaweed and whatever else you add to your sushi roll and put it in a bowl with some dressing, like you would do to a regular salad, and taa-daa, here you have it.

    What I personally love about this dish is the freshness of the ingredients and that I feeds you without being too heavy. Below I propose my favorite healthy, classic version which takes no more than 15 minutes to prepare.


    Ingredients (for 2 portions):
    • 200 g smoked salmon;
    • 1 medium carrot;
    • 100 g seaweed salad;
    • 1 ripe avocado;
    • 1 spring onion;
    • 1/2 English cucumber;
    • 200 g steamed rice;
    • 150 g soy beans; 
    • soy sauce;


    TIP for those of you living in the Netherlands!

    You can easily find all these ingredients at Albert Heijn, that's where I bought mine from. They always have fresh soy beans, smoked salmon cubes which go right into your dish and one tasty seaweed salad. Moreover, for this recipe I used Basmati Rice form Tilda, which already comes steamed, you don't have to cook it anymore. Getting all your all ingredients from one place and ready to be served it's really convenient and it saves you a lot of time.

     I started by preparing the vegetables. I finely chopped the spring onion, removed the cucumber's seeds and sliced it in small cubes, sliced the avocado and peeled thin strips of carrot. *If you are not getting your rice already steamed, prepare it according to the packaging instructions. Then I added all of them in bowl together with the rest of the ingredients, sprinkled some soy sauce and that's it. Super fresh, healthy, quick and delicious meal.


     Enjoy!


    Monday, September 9, 2019

    Goat Cheese and Mushroom Pasta


    It's pasta time (again)! Recently I came across a Facebook video of a goat cheese pasta sauce recipe, which basically involved mixing warm pasta water with cheese, and that gave me an idea for a very quick and affordable dish. However, I did not want just plain pasta and sauce, maybe some extra seasoning, so I threw some more ingredients in there which I had around and also felt they would make sense. The result surprised me and made me ask myself why I did not think of that earlier, especially since I am a huge goat cheese lover. ( I have it in my fridge almost 90% of the time). Anyhow, now I can add on my list a new tasty recipe that only takes 15 minutes, so better late than never, right?

    Ingredients (for one portion):
    • aprox. 65 g dried pasta
    • one hand of sliced mushrooms ( I used a mix)
    • 2 slices of ham
    • 60 g creamy goat cheese
    • pasta water
    • one garlic clove
    • parsley
    • salt and pepper 
    • Parmesan (optional)  
    I started with pasta the water. I usually boil it in a water cooker and then put it on the stove, because then it takes less than 5 minutes to reach the optimal boiling point, so everything moves way faster. Don't forget to properly salt your water.

    In the meantime I sliced the mushrooms, the ham and chopped the garlic and I roasted them in one teaspoon of olive oil. When my water was boiling I added the pasta and I cooked it until al dente, according to the packaging instructions. 

    After the pasta was cooked I added it over my roasted ingredients, turned off the heat, and then added the goat cheese and a little bit of pasta water, while giving it a proper stir. I kept stirring (and gradually adding water if it was necessary) until de cheese melted and a beautiful soft and creamy sauce formed. I ended by adding fresh parsley, seasoning with salt and pepper, and sprinkling some Parmesan.


                                                      Enjoy! 

    Saturday, March 16, 2019

    Orange Loaf Cake


        Who doesn't love the fresh smell and taste of citruses, of their sweet and sour juice or their volatile oil hidden in the zest? This magic fruits serve de basis for an amazing dessert, the loaf cake, spongy, soft, fluffy and moist. The main star today is the orange, which for me has the perfect balance between sweet and sour. (I might have also chosen orange because a good friend of mine had an intense craving for this dessert and used to mention it to me daily for a while).  If I've already captured your attention and you're wondering what you have to do in order to get this cake, don't worry, you just have to keep adding and adding orange at every step, and there will still not be enough. So let's preheat our ovens and star baking.


     Ingredients:

    • 115 g soft butter
    • 250 g flour
    • 100 g sugar
    • 1 vanilla bean
    • 3 tsp. baking powder
    • a pinch of salt
    • 2 large eggs
    • 100 ml orange juice
    • 5 ml cognac 
    • 2 Tbsp. orange zest
    • 1 Tbsp. lemon zest


    Extra:
    • some more orange juice+ orange zest
    • powder sugar


    !! I recommend using organic oranges and lemons for this recipe because they are not chemically treated. Search in your local supermarket for citruses that have their zest suitable for consumption.

        I prepared the dough by separately mixing the dry and the wet ingredients and the combining them. First, with the help of a mixer I beat the butter together with the sugar until the sugar dissolved and the mixture got creamy. Afterwards I added the eggs, one by one, mixing continuously. When the eggs were incorporated I added all the other wet ingredients: the orange juice and zest, lemon zest, cognac and the vanilla from one bean and I mixed until fully homogeneous.

        In a separate bowl I mixed the flour together with the baking powder and salt. I gradually incorporated the flour mixture into the wet one and poured everything in a loaf tray. If you are using a silicone tray I suggest greasing it with some butter before pouring the mixture and If you are using a tin one also cover it with some baking paper after greasing it, in this is way you will remove the cake easily and you don't risk tearing it apart. 

    Final mixture in the loaf tray

        After this essential step I baked the cake for 40 minutes in the preheated oven at 180 Celsius/ 4 on gas. The cake is ready when it reached a golden-brown color and the top is cracked, like you can see in the picture below.  You can also check it by inserting a toothpick which should come out completely clean when the cake is done. 
     
    Cooling down the baked cake

        After the cake was baked I took it out of the oven, letting it to partially cool down. While is was still warm (not hot) I poured some orange juice over it in order to make it moist. The rule for this soaking process in quite easy to remember: if the cake is warm, then the liquid used to make it moist has to be cold and if the cake is cold them the liquid has to be warm. Finally, I let it completely cool down and I glazed it with some orange icing which I made by mixing powder sugar with some orange juice until I got a thick and creamy consistence. Feel free to pour as much icing as you want :). I sprinkled some orange zest, I let the cake chill in order for the icing to thicken and then I dug in. 


    Glaze

    Enjoy!

    Sunday, February 24, 2019

    Apple Cinnamon Pie


    It's pie time (again)! As it is still winter and there are not many fresh fruits available I decided to use something specific for this season and keep berries for later. The advantage of apples is that they are not pretentious at all and if you add some spices around them you can create an absolutely delicious dish. Another reason for choosing apples is that I baked this pie when I was still back home, in Romania, and my parents literally had a crate full of apples on the balcony: too many to be eaten until they were going to rot. Moreover, some of them were already moist and had their skin wrinkled and as you can imagine were not that appealing to be eaten like that. I absolutely despise the idea of throwing away good food and I always encourage and emphasize different ways of cooking or transforming it so it still can be consumed. So, I hope this recipe gives you an idea of what to do with some not so pretty apples. (works also with pear :) )

    Ingredients:

    For dough:

    You can see how I make the dough here, as I have this recipe that bakes really beautiful and I usually use it for all the pies I am making. The quantities of the ingredients are the same.

    For filling:
    • 10 medium apples
    • 3 Tbsp granulated sugar
    • cinnamon
    • juice from half a lemon
    • 2 tsp. vanilla extract
    Extra:
    • 1 egg
    • granulated sugar


         I started by preparing the dough as in the recipe provided in the link above. Then I peeled the apples and I cut them in medium pieces, I put them in a bowl, added the granulated sugar, vanilla extract, cinnamon ( add as much as you like, I personally add A LOT) and lemon juice and mixed them all together.

        After I placed to dough in the tray I added my apple mixture and then I covered the pie entirely with dough, making some holes with a fork to make sure that the pie can "breathe" during baking. 

        I dind't forget to grease the pie with some egg wash and sprinkle some granulated sugar before throwing it into the oven.


        For the baking part the same story applies as in the previous recipe. I preheated the oven to 200° C/ gas 5 where I kept the pie for 15 minutes, then I lowered the temperature to 180 °C/ gas 5 and I kept it for another 35-40 minutes until golden brown.

        Finally I let the pie cool down and then served it, of course, with vanilla ice cream, because what else could go better with a pie like this?


    Enjoy!

    Friday, December 28, 2018

    Leftover chicken salad with pickles and tabasco mayo dressing


     So, what is the part with leftovers, you may ask. Well, as a student you don't really afford to throw food away, especially when is still perfect for consuming. And to be honest, you shouldn't do that anyway, even if you are a student or not. Therefore, with this recipe not only I am trying to support consumption of leftovers in order to avoid wasting food, but I am also showing that you can use them to create a super delicious dish. This idea made me think of Antoine Lavoisier's quote "nothing is lost, everything changes". 

    One day me and my flatmates cooked some really tasty chicken wings glazed with some sweet chili sauce but we didn't really end up eating all of them. So the next day I was wondering what to do with what is left, considering that I wasn't really up for eating cold/reheated plain chicken, so I threw it into a bowl with veggies and a good dressing and turned it into a proper healthy and tasty meal.

    Side note: The quantities for the ingredients bellow are predictive for one portion but you don't usually make a salad after a rigorous recipe, so just use your imagination and your taste to adjust the quantities and to make the dressing as sour and spicy as you want. ;)


    Ingredients:

    •  half a lettuce
    • 2 medium tomatoes
    • 2 pickles 
    • leftover chicken
    • 40-50 g croutons
    • 2-3 Tsp mayonnaise
    • Tabasco
    • lemon juice
    • salt
    • pepper 


    What I did for this salad is that I kept my chicken cold, I sliced my fresh tomatoes and my pickles, chopped the lettuce and added croutons that I got from the supermarket (from the same reason mentioned in my first "15 minutes project" recipe). I also added some cubes of Mozzarella cheese in this particular salad because I wanted to use all ingredients I had in the fridge at that time. (I guess that's a student habit haha)

    For the dressing I mixed mayonnaise with a lot of lemon juice (because I find supermarket mayonnaise to greasy and heavy so I am making it as sour as possible), then sprinkled a little Tabasco, spicy enough to pinch my tongue. Mixed everything together, added some salt and pepper, and voila, yesterday's chicken in today's salad.


    Enjoy!
     

    Tuesday, October 30, 2018

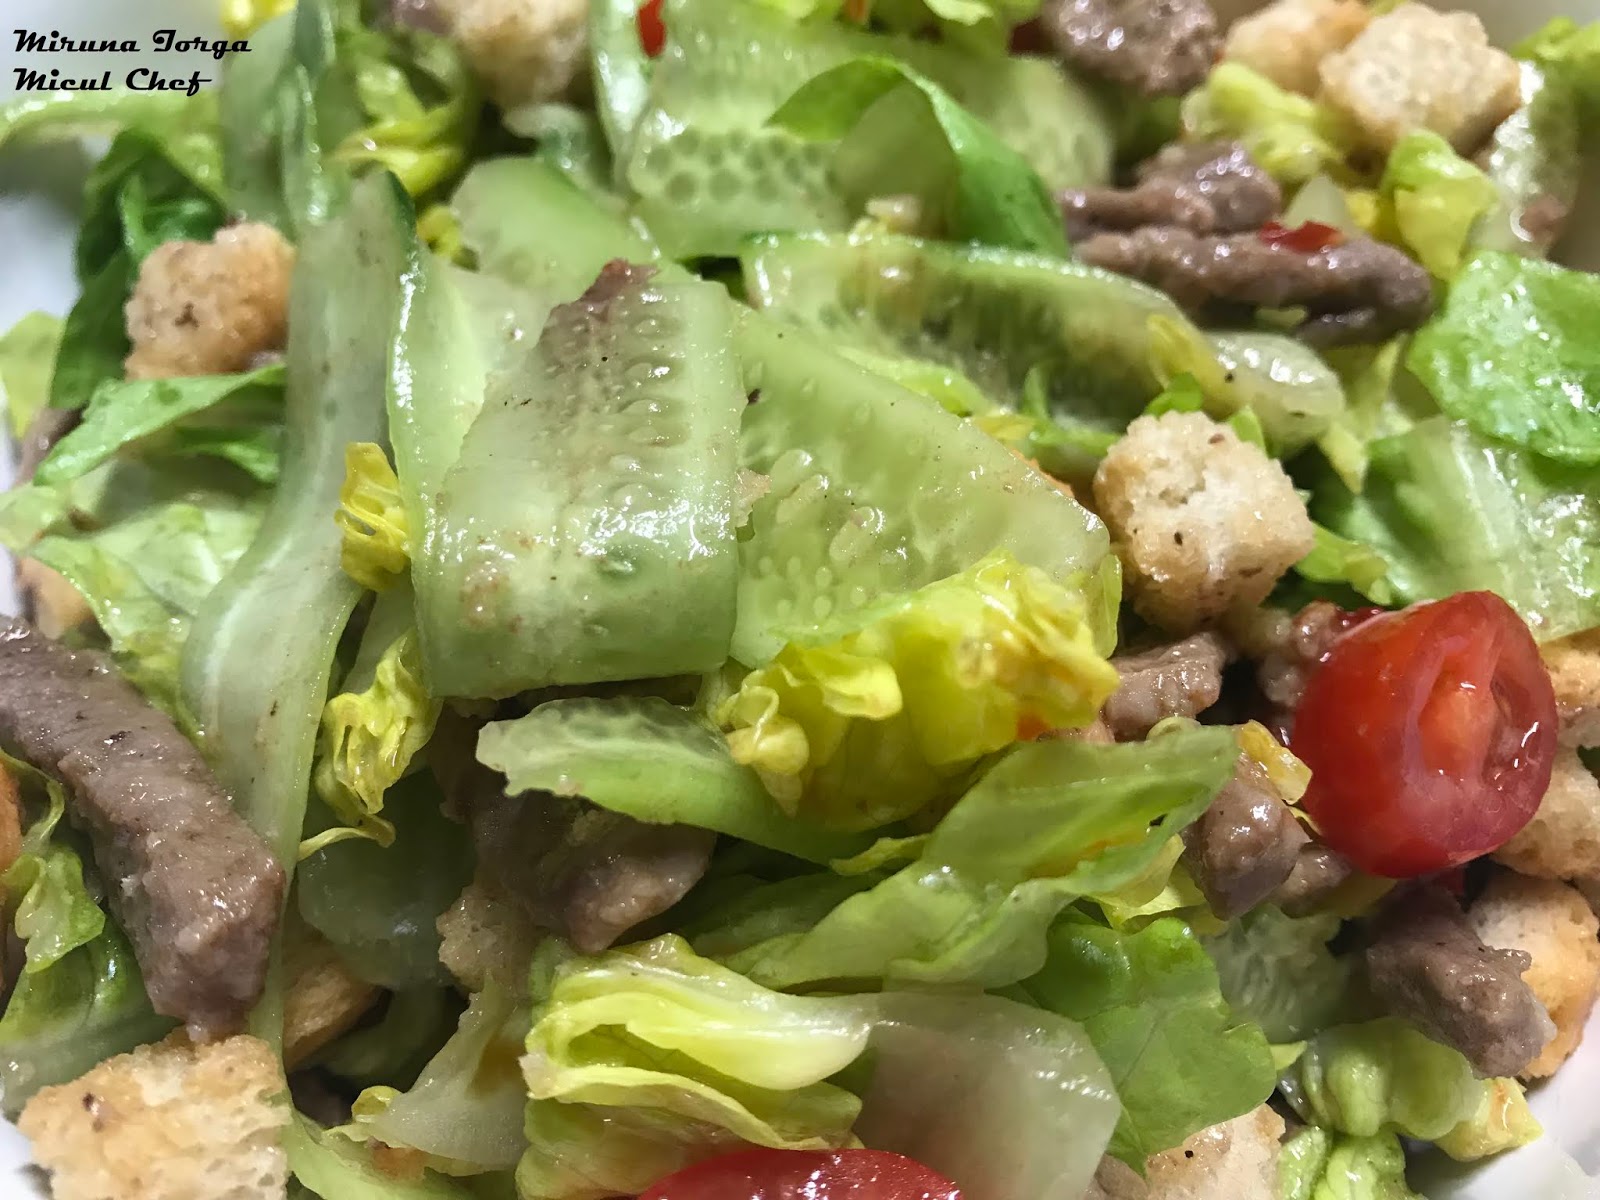
    Beef salad with garlic, sweet chili and lime dressing


        It's time for the first salad from this project. I inspired myself from a Gordon Ramsay's recipe I once found online and it seemed really interesting, but as I did not have all the fancy ingredients around I gave it a try in my own way, and it turned out to be delicious. To make all the cooking process fast, in general, I buy already made croutons (which is a lazy move from me since I could do myself some really good ones), but it  helps me save some time. I also keep most of the time a stack of meet in the freezer, nicely portioned, and in the morning when I go to school I take one portion out and let it defrost, so when I come back in the evening is waiting for me, ready to be cooked. The rest is just cutting some veggies and mixing the dressing, nothing too complicated or that requires too much time. So let's get started!

    Ingredients (for 1 portion):
    • 40-50 g croutons ( approx 1 hand )
    • 1 hand of cherry tomatoes
    • 1 medium cucumber 
    • half of an iceberg salad
    • 200-250 g beef
    • juice from a lime
    • 3 garlic cloves
    • 2-3 Tbsp sweet chili sauce
    • olive oil
    • butter
    • salt
    • pepper

        First I started with the beef, and to make thing even quicker that they already were, I got some
    already sliced beef, like it can be seen in the picture (because that is a thing in the Netherlands, you can find everything already sliced, from fruits and vegetables to meat, but that's a story for another time). I cooked the beef in a little bit of butter, with some salt and pepper, until it was done, but not dry, and I set it aside.

        Then I sliced my cherry tomatoes, I peeled thin cucumber strips  and finely chopped the Iceberg salad. I added everything to a huge bowl, added the beef, which cooled down a little bit in the meantime, and the croutons and preceded with the dressing. 

        For this I mashed the garlic cloves, added the lime juice and the sweet chili, and in order to find a balance between tastes and to soften the dressing a little bit I also added about 1 and 1/2 Tbsp of extra virgin olive oil.

       What is left is to pour the dressing over the other ingredients in the bowl, give it a good shake, so everything nicely mixes and the crunchy croutons soften up a little bit, add salt and pepper as you wish, and voila, you dinner is ready!

    Enjoy!

    15 minutes project


        Approximately one year ago my life changed completely, as I moved to another country, 2000 km away from home, to go to university. Translated, all my habits, all the things I was familiar with and everything that I used to grow up with literally went away over night. I found myself forced to suddenly be an adult, and, in the confusion and stress that occurred in the beginning ( and in the months after, if I am to be honest) I was going a little crazy as there were too many things to do and too little time, basically my time management and approach to every-day activities was screaming for help. Some of the things that considerably changed were, of course, cooking and eating.

        Back home I had time to lock myself in the kitchen for hours, to experiment fancy dishes, to cook for my family, to clean everything after that and to still have plenty of time and energy. After I moved to The Netherlands, this situation changed to 180 degrees. There were, of course,  occasions where I was gathering with my friends and we were cooking together, or I was cooking for them, but there were also plenty of days, especially around midterms and finals, when I was coming from the University at 9 or 10 in the night, desperately hungry, with no energy or willingness to cook anything.  The good news were that I could order any time, or eat frozen food for the supermarket. The bad news were than after couple of weeks you just get sick of eating fast food, you realize how much money you spend on that and it all stops for good when you notice you re not fitting in your favorite jeans anymore. ( happened more than once :( )

        Considering all the above, I came up with the idea of a healthy, quick and tasty solution, so here I am introducing my "15 minutes project". I am going to share my cooking experience by posting a series of salads (and not only) which take no more than 15 minutes, have some super tasty ingredients and dressings and which are also versatile enough, not only in terms of taste, but also in terms of ingredients. There's veggies, meat, some carbs, all meant not only to look good in the plate, but also to properly fill you up.

    * I would like to show me greatest appreciation to my best friend and flatmate, Angela Negru, who provided this beautiful bowl that made all of these photos possible. Also, she is the one that is always by my side in the kitchen, we often cook together, share ideas and taste each other's dishes. So Angie, thanks for being a part of this project and part of my inspiration.

    Saturday, September 8, 2018

    Sour cherry and peach pie


    Romana ( English below): 

        Inceputul lui septembrie ne da in sfarsit frau liber la a porni cuptoarele, si desi Romania inca se joaca de-a canicula, in Olanda lucrurile nu stau la fel. Asadar, imi permit sa vorbesc acum despre o alternativa a placintelor pe care le fac bunicile mele. Plecam de la traditionalul dovleac, mar, sau branza, spre ceva cu influente vestice si arome reinterpretate. Iar versatilitatea acestui desert nu se opreste doar aici, ci continua si cand vine vorba de compozitie sau design.


    Ingrediente:

    Pentru aluat:
    • 350 g faina
    • 1/4 lg sare
    • 3 Lg zahar tos
    • 230 g unt rece
    • 75 ml apa rece
    • 1 lg pasta vanilie
    • coaja de la o lamaie
    Pentru umplutura:
    • 400 g visine
    • 2-3 piersici medii
    • 2 Lg amindon
    • 3 Lg suc de lamaie
    • 1lg esenta de vanilie
    • 30 g unt
    Extra:
    • 1 ou
    • zahar tos


         Am inceput, evident, cu pregatirea aluatului. Intr-un bol am adaugat toate ingredientele uscate (faina, zaharul, sarea) impreuna cu pasta de vanilie si coaja de lamaie. Am adaugat apoi untul rece taiat in cubulete si am framantat cu varfurile degetelor pana cand aluatul avea aspectul unor firimituri. Am incheiat prin a adauga treptat apa pana cand aluatul a fost inchegat, apoi l-am impartit in 2 bile (3/4 si 1/4) si l-am tinut la frigider pentru o ora. 

        Esentiala in aceasta etapa este viteza. Aluatul trebuie sa fie unul usor crocant, sfaramicios, de aceea untul nu are voie sa se topeasca, asa ca trebuie sa ne miscam cat mai repede posbil. Totul se poate face, dupa preferinte, si cu ajutorul unui robot de bucatarie. 

        Cat aluatul era la frigider m-am ocupat de pregatirea umpluturii. Intr-un bol am adaugat visinele fara samburi, piersicile curatate de coaja taiate bucati si le-am amestecat cu amidonul, vanilia, sucul de lamaie si untul usor moale.

        Am uns apoi o tava rotunda cu fund detasabil (cca. 24 cm) cu unt in care apoi am asezat bila mare de aluat intinsa la un diametru cu 4-5 cm mai mare decat tava, la o grosime de cca. 2,5-3 mm. Dupa ce a am asezat bine baza de aluat in tava am adaugat umplutura. Cu bila mica de aluat puteti fi inventivi, pentru ca reprezinta "capacul" si in acelasi timp decorul placintei. Eu am ales sa folosesc fasii de aluat care se intrepatrund si inimioare. Am taiat apoi marginile de aluat si le-am intors in interior pentru a "sigila" compozitia. La final am uns placinta cu un ou batut si apoi am presarat zahar tos.

    Pentru copt am preincalzit cuptorul la 200 °C/ treapta 5 pentru gaz unde am tinut placinta pentru 15 minute, apoi am redus temperatura la 180 °C/ treapta 4 pentru gaz unde am tinut-o inca 35-40 de minute, pana a capatat un aspect auriu.

    Am scos placinta din tava abia dupa ce s-a racit si am servit-o asa cum imi place cel mai mult, cu o cupa de inghetata de vanilie. (Merge la fel de bine cu inghetata de lamaie sau de cocos) .

                                                   
                                                             Pofta buna! :D

     English: 

        The beginning of September finally gives us the freedom to turn on the ovens, and although Romania is still playing the heatwave game, in The Netherlands things look a little bit different. Therefore, let me talk about an alternative to the pies my grandmothers do. We move from the traditional pumpkin, apple or cheese to something with western influences and reinterpreted flavors. And the versatility of this dessert doesn't only stop here, but also when it comes to filling and design.

    Ingredients:

    For dough:
    • 350 g flour
    • 1/4 tsp. salt
    • 3 Tbsp. granulated sugar 
    • 230 g cold butter
    • 75 ml cold water
    • 1 tsp. vanilla paste
    • zest from 1 lemon 
    For filling:
    • 400 g sour cherries
    • 2-3 medium peaches
    • 2 Tbsp. starch
    • 3 Tbsp. lemon juice
    • 1 tsp. vanilla extract
    • 30 g butter
    Extra:
    • 1 egg
    •  granulated sugar
        I started, obviously, with the preparation of the dough. In a bowl I added all the dry ingredients (flour, sugar, salt) along with the vanilla paste and the lemon zest. Then I added the cold butter cut intro small cubes and kneaded with the tip of my fingers until the dough had the appearance of bread crumbs. I ended up gradually adding the water until the dough was done, then split it intro two balls ( 3/4 and 1/4) and kept it in the refrigerator for an hour.

    Essential in this stage is the speed. The dough must be crunchy, therefore the butter is not allowed to melt, so we have to be as fast as possible. Everything can be done, according to your preferences, with the help of a kitchen robot.

    As the dough was in the refrigerator, I was busy preparing the filling. In a bowl I added the sour cherries with their pips removed and the peeled peaches cut into peaces and mixed them with the starch, vanilla, lemon juice and soft butter.

    Then I greased a round tray with a removable bottom  (approx. 24 cm) with some butter and I placed the big ball of dough with a diameter of 4-5 cm greater that the tray and a thickness of approx. 2,5-3 mm. After I placds well the base dough in the tray I added the filling. With the small ball of dough you can be inventive because it is both the cover and the ornament of the pie. I have chosen to use dough strips that intertwine and small hearts. Then I cut the edges of the dough, I flipped them to the inside of the pie to "seal" the filling. In the end, I greased the pie with some egg wash and sprinkled some granulated sugar.

    For the baking part I preheated the oven to 200° C/ gas 5 where I kept the pie for 15 minutes, then I lowered the temperature to 180 °C/ gas 5 andI kept it for another 35-40 minutes until golden brown.

    I took the pie out of its tray only after it cooled down and served it the way I like the most, with a scoop of vanilla ice-cream. ( It works just as well with lemon or coconut ice-cream).

                                                                Enjoy!

    Wednesday, July 18, 2018

    Spicy prawn soup


    Romana:

        Da, stiu, e vara, soare, cald, iar toata lumea incearca sa se racoreasca. Insa acum cateva saptamani cand am gatit acesta supa un val de vreme rece a venit peste Tilburg, Olanda, unde locuiesc in prezent. Si m-am trezit undeva pe la mijlocul lunii iunie cu 12 grade Celsius in termometru, cautand disperata in fundul dulapului un pulover mai gros. Trecand la partea gastronomica, afara e frig, dar parca nu merge sa gatesti orice, o parte din tine stie ca e totusi vara. Asa ca de la o supa sau ciorba clasica am sarit la ceva un pic mai exotic, picant, cald, dar in acelasi timp fresh si sper sa retata asta sa inspire lumea sa experimenteze mai mult si sa incerce combinatii interesante in materie de supe. 

    Ingrediente (4 portii):
    • ulei de masiline extra virgin
    • 400 g amesteg de legume stir-fry la alegere
    • 150 g ciuperci shiitake
    • 3 lg pasta verde de curry
    • 400 ml lapte de cocos
    • 1 L supa de legume
    • 250 g creveti 
    • 150 taietei pentru wok
    • sare
    • piper
    • fulgi de chili
        Desi o preparare ca la carte necesita un wok, studentia nu-ti perminte luxul unei bucatarii complet utilate, asa ca ne vom folosi de o simpla tigaie. In aceasta tigaie am incins 1 lg de ulei in care am calit ciupercile taiete felii impreuna cu amestecul de legume sitr-fry, iar cand au fost gata le-am dat deoparte. Intr-o oala separata am calit pasta de curry pentru cateva secunde, apoi am adaugat laptele de cocos si supa. Cand amestecul a dat in clocot am adaugat crevetii si taieteii si am lasat la foc mic pana acestia s-au gatit uniform. Am adaugat peste supa amestecul de legume si ciuperci, am asezonat cu sare, piper si fulgi de chili dupa gust, si am fost gata de servire.


    Si partea cea mai frumoasa este cand prietenii iti apreciaza mancarea! 
    Pofta buna! 


    English:


        Yes, I know, it's summer, extremely hot, and everybody is trying to cool down in one way or another. However, few weeks ago when I made this recipe few days of cold weather came over Tilburg, Netherlands, where I currently live. So I found myself somewhere in the middle of June with 12 Celsius, while desperately searching for a warm sweater in the back of my closet. Moving to the culinary aspect of the story, although it was chilly outside, I didn't feel like I can cook anything, some part of me still knew it was summer so I changed the classic soup or ciorba with something more exotic, spicy, warm but fresh in the same time and I hope that with this recipe I inspire more people to experiment more and to try interesting combinations when it comes to soups.

    Ingredients (4 servings):

    • extra virgin olive oil
    • 400 g stir-fry vegetables ( your choice)
    • 150 g shiitake mushrooms
    • 3 tbsp green curry paste
    • 400 ml coconut milk
    • 1 L vegetable stock
    • 250 g prawns
    • 150 g wok noodles
    • salt
    • pepper
    • chili flakes 
        Although a proper approach to this recipe requires a wok, living as a student doesn't offer the luxury of a fully equipped kitchen, so we're only going a use an ordinary pan. I started with cooking the vegetable mix together with the sliced mushrooms in 1 tbsp of olive oil. When ready I set them aside and in another pot I fried the curry paste for couple of seconds, I added the coconut milk and the stock and brought to boil. When the mix was boiling I added the noodles and prawns and cooked on low heat until they were tender. In the end I mixed the soup with vegetables and mushrooms, I seasoned with salt, pepper and chili flakes and was ready to serve.

    And the best part of this is when your friends love what you cook for them!
    Enjoy! 


     *Special thanks to Ada, Angela and Madalina
     *Recipe inspired from www.bbcgoodfood.com 

    Thursday, February 1, 2018

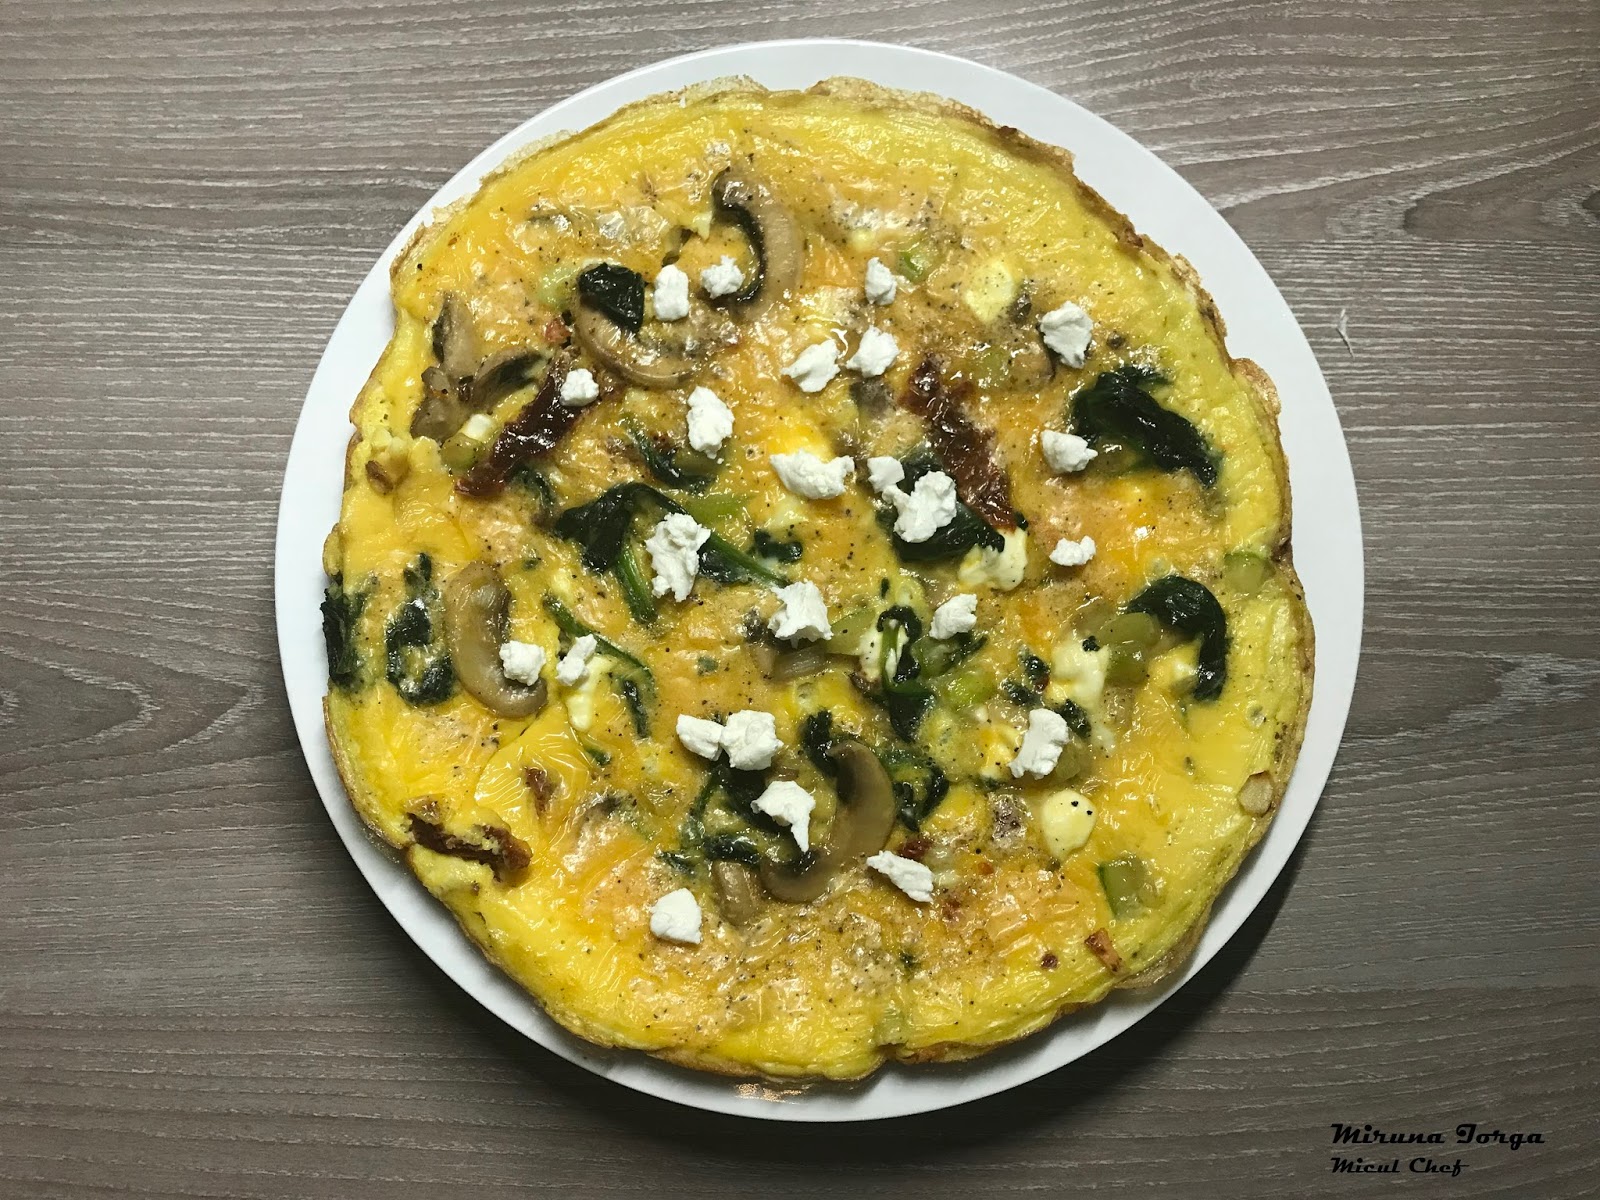
    Veggie Frittata

    Romana:

        Mic dejun, brunch sau pranz? Exista un preparat potrivit pentru toate aceste mese, gustos, satios si usor de gatit. In esenta, Frittata este un preparat italian ce se aseamana cu o omleta, insa este mult mai complex prin varietatea ingredientelor folosite, de la legume, la carne si paste si prin modul de preparare, fie pe aragaz, fie la cuptor. Astazi prezint reteta mea proprie in care mi-am explorat creativitatea cu legumele pe care le aveam in frigider. De asemenea, am preferat sa gatesc preparatul doar pe aragaz, si desi ouale si pot amesteca cu lapte sau cu smantana lichida, am preferat sa raman in limitele unei retete light si clasice.

    Ingrediente:
    • 5 oua
    • 2 Lg ulei de masline extra virgin
    • 100 g spanac proaspat
    • 1 ceapa mica
    • 1/3 dintr-un dovlecel mediu
    • 150 g ciuperci mix 
    • 3-4 bucati rosii deshidratate
    • branza de capra 
    • fulgi de chili
    • sare
    • piper
        Intr-o tigaie am pus pus uleiul de masline la incins, apoi am calit la foc mediu ciupercile si dovlecelul taiate in bucati medii si am adaugat apoi spanacul si ceapa tocata marunt. Nu am uitat sa asezonez cu sare si piper dupa gust. Intr-un bol am batut cele 5 oua, am adaugat sare, piper si fulgii de chili. Cand legumele din tigaie au fost gata, am adaugat rosiile deshidratate tocate marunt si am presarat branza de capra, apoi am turnat imediat ouale batute si am dat focul la mic. Este important sa lasam legumele sa se gateasca bine inainte de a adauga ouale pentru ca sucul lor sa se evapore, astfel Frittata se va gati uniform. Dupa ce ouale au fost pe jumatate coagulate, am pus capacul tagaii si am lasat in continuare la foc mic pana cand ouale au fost complet coagulate si preparatul era auriu. La final, pentru extra gust, am presarat inca putina branza de capra.

    Pofta buna!

    English:   

        Breakfast, brunch or lunch? There is a dish that suits all of these meals, tasty, nourishing and easy to cook. Essentially, Frittata is an italian dish that resembles omlette, but is more complex due to the variaty of ingredients used, from vegetables to meat and pasta, and due to its cooking procedure, either on the stove or in the oven. Today, I'm presenting my own recipe in which I explored my creativity with the vegetable I had in the fridge. Also, I preferred to cook the dish just on the stove, and although the eggs can be mixed with milk or cream, I prefered to stay in the range of a light and classic recipe.

    Ingredients:
    • 5 eggs
    • 2 spoons extra virgin olive oil
    • 100 g fresh spinach
    • 1 small onion
    • 1/3 medium zucchini
    • 150 g mushroom mix
    • 3-4 sundried tomatoes
    • goat cheese
    • chili flakes
    • salt
    • pepper
         In a pan I heated the olive oil on a medium heat and then I cooked the mushrooms and the zucchini medium chopped, then I added the spinach and the finely chopped onion. I didn't forget to add slat and pepper. In a bowl I whisked the eggs and I added salt, pepper, and chili flakes. When the vegetables in the pan were ready, I added chopped sundried tomatoes and goat cheese and I quickly poured the eggs and let them cook on low heat. It is essential to cook the vegetables well before adding the eggs, thus their juice will evaporate and the Frittata will cook properly. After the eggs were half coagulated I covered the pan and let them fully cook until golden brown. In the end, for an extra taste, I sprinkled more goat cheese.

    Enjoy!

    Saturday, January 27, 2018

    Tarta Tatin cu mere

        Desi tarta Tatin aduce cu o simpla placinta cu mere, aceasta are in spate o istorie interesanta, inceputa in anul 1880, in Franta, la Hotel Tatin, care ii da si numele. Este vorba despre surorile Stephanie si Caroline Tatin, proprietarele hotelului, care au copt desertul rasturnat din greseala, dand astfel nastere unui preparat inedit ce avea sa ajunga celebru. Deci cum e sa stii ca acesta tarta atat de populara si de indragita a inceput ca o neatentie gastronimica? 
        Lasand istoria la o parte, ceea ce imi place in mod special la acesta tarta este modul de preparare, care pe langa usurinta si rapiditate permite fructelor sa-si pastreze o textura umeda, suculenta si nu lasa sa se piarda nicio aroma.

    Ingrediente:
    • 100 g unt + 1 cub
    • 180 g faina
    • 20 g zahar pudra
    • 4 Lg zahar tos
    • 1 ou
    • 2 Lg apa rece
    • 6 mere
    • 1 lg pasta de vanilie
    • 1 lg scortisoara
    • un strop de apa pentru caramel

         Am inceput prin a prepara blatul intr-un robot de bucatarie pentru eficienta, dar acesta poate fi facut la fel de usor si la mana. Am adaugat faina, zaharul pudra, oul, pasta de vanilie (desi sunt in continuare un fan al pastaii de vanilie, recomand pasta naturala de vanilie deoarece se incorporeaza mai usor in preparat iar aroma este mai intensa) si untul rece taiat cubulete, apoi am mixat treptat aluatul pana la omogenizare. La final, pentru a lega aluatul, am adaugat si cele doua linguri de apa si l-am dat la rece timp de o ora.
         Trecand la partea aromata, tava in care am copt tarta a trecut mai intai pe la aragaz, unde la foc mic am adaugat zaharul tos, scortisoara si cubul de unt pana ce am obtinut un sos de caramel pe care l-am diluat usor cu un strop de apa. Apoi am asezat uniform peste sosul de caramel merele curatate de cotor si coaja si taiate felii. 
        Am scos apoi aluatul de la rece, l-am intins intr-o foaie cu grosimea de 2-3 mm si l-am asezat deasupra merelor, avand grija sa sigilez bine continutul pentru ca fructele sa ramana moi. 
         Am dat apoi tarta la cuptor la temperatura de 180 grade Celsius/ treapta 3-4 pentru gaz cca. 25-30 de minute pana ce crusta a capatat o culoare aurie. 
        Dupa ce desertul a fost gata l-am lasat usor la racit, pana cand a devenit caldut, apoi l-am rasturnat pe un platou. Un pas important pentru ca preparatul sa fie complet este sa il rasturnati cat este caldut pentru a permite siropului din fructe sa se scurga in aluat si sa il insiropoze. Astfel, dintr-un blat sfaramicios de tarta avem un aluat moale si fin.
         Pentru ca tarta este foarte aromata, imi place sa o mananc simpla, fara nimic alaturi, poate doar cu un strop de scortisoara in plus care sa amplifice aroma catifelata a merelor.


     Pofta buna!